3: Groups
Groups are admin-defined groups of devices that share the same content (apps and files) & settings (like WiFi network and launch method). If you add or remove an app or file to or from a Group, that app or file will be added/removed from all devices within the Group. Likewise, if you change a Group's settings such as the launch method, that launch method will be applied to all devices in the Group.
Creating Groups
Click Groups in the navigation sidebar.
Click Create Group.
Next, do the following:
Enter a title for the Group.
Specify the Device Type that will be added to this group (i.e., whether the Group will be used to manage Pico Neo 2 devices, HTC VIVE Focus Plus devices, etc.).
Click Create Group.
You will now be directed to the Group's overview page to begin adding devices.
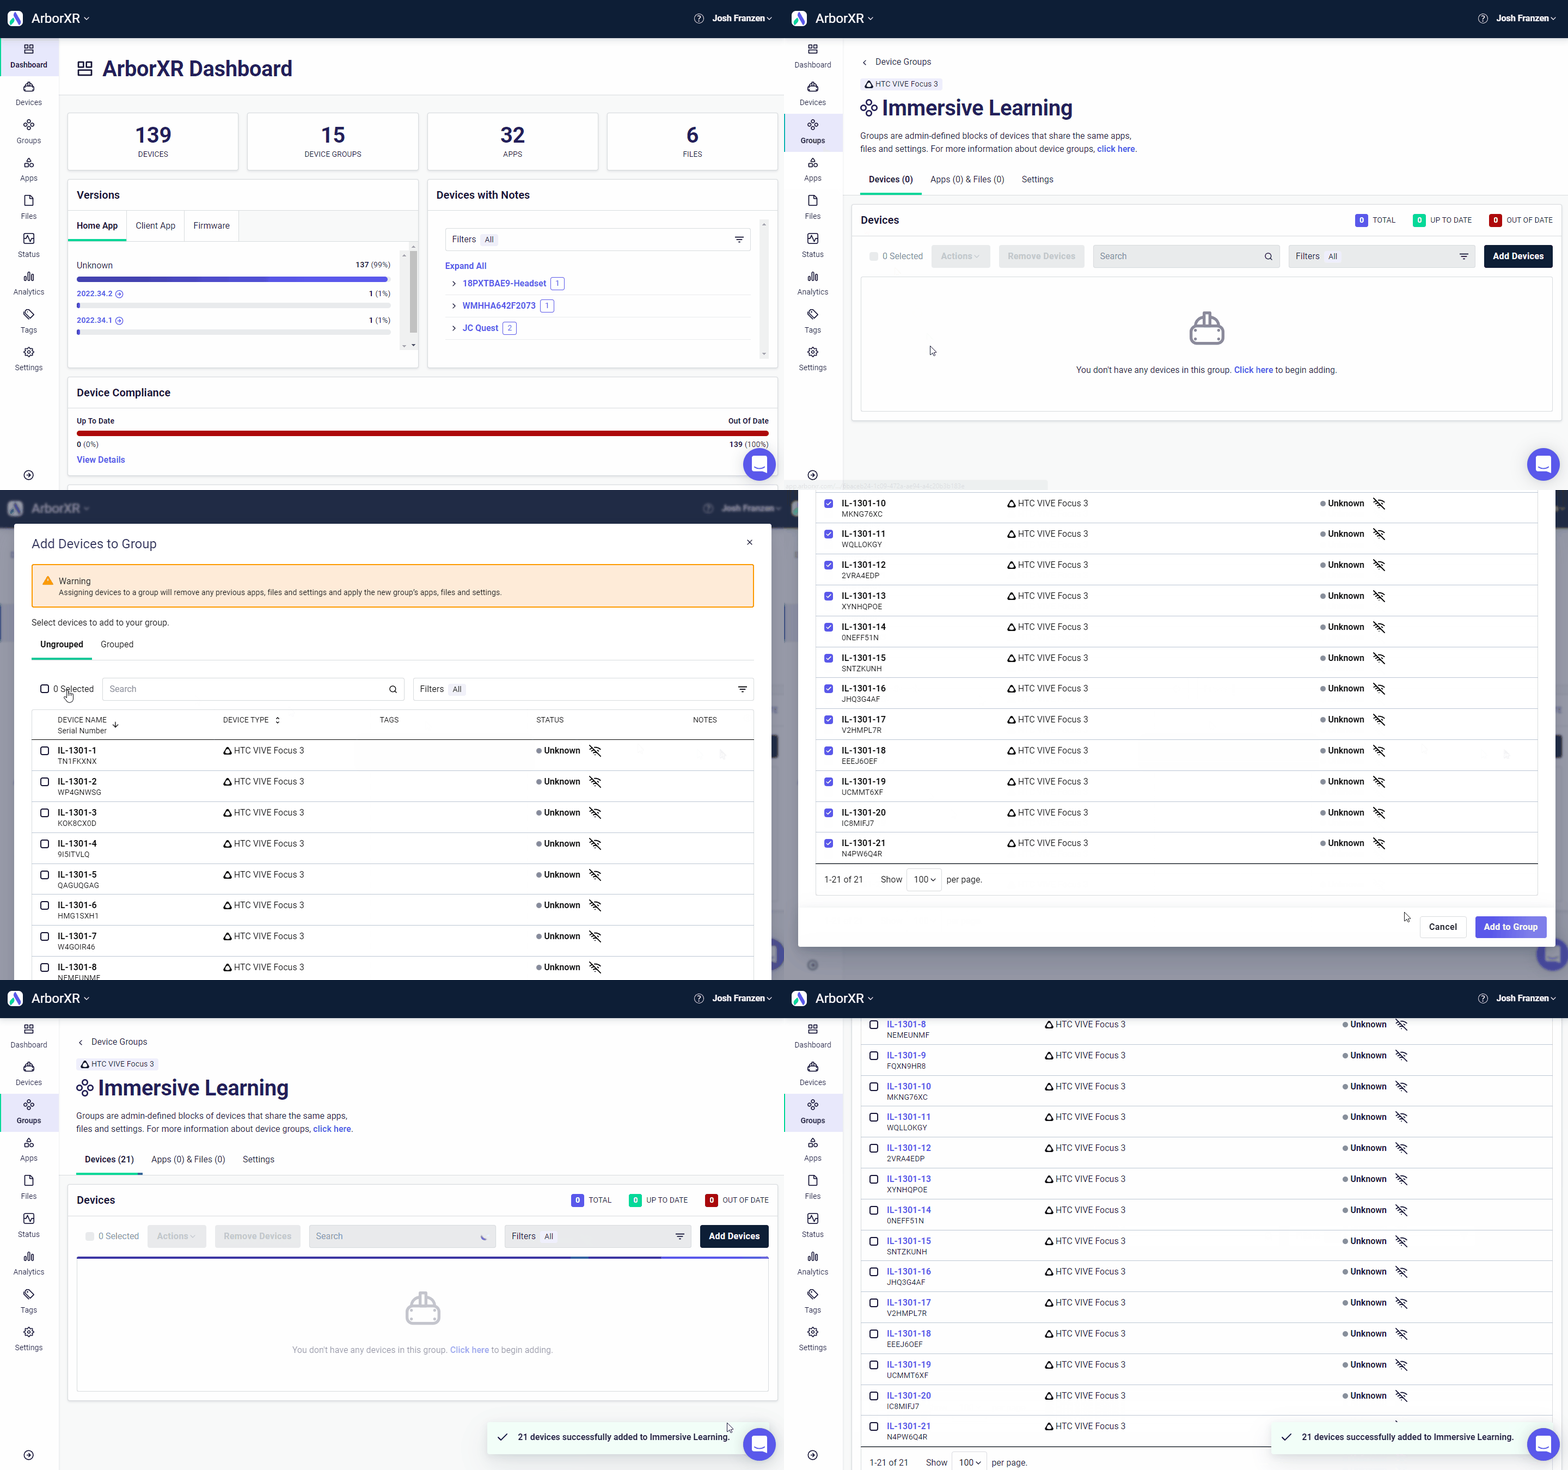
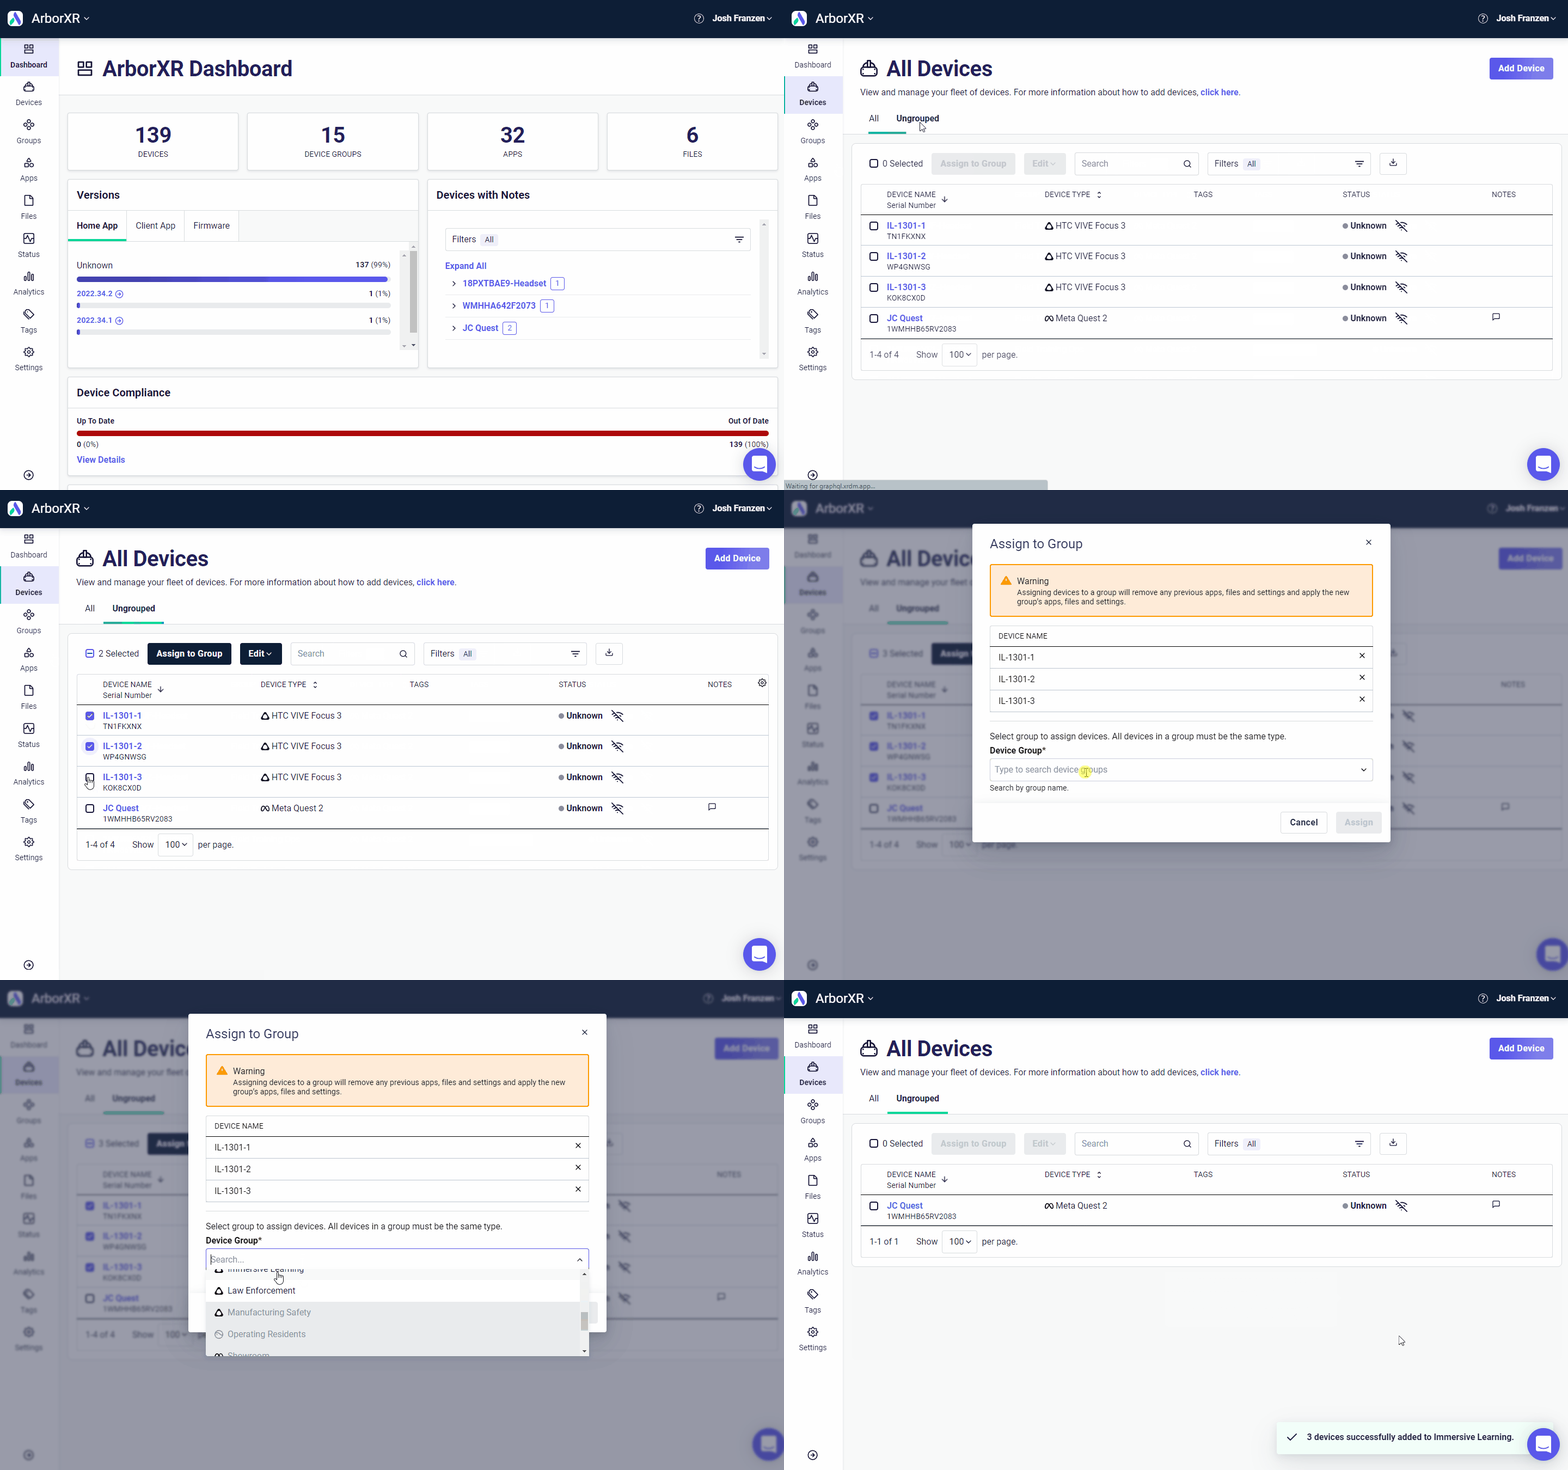
Adding Devices to Groups
Once you have set up devices with ArborXR, you have two options for assigning devices to a group.
Option 1: Group Overview Page
Click Groups in the navigation sidebar.
Navigate to the Group in question.
Click Add Devices.
Select devices then click Add.
Option 2: Device Index Page
Click Devices in the navigation sidebar.
Select the Ungrouped tab.
Select relevant devices.
Click Assign to Group.
If you have multiple device types selected (e.g. Pico Neo 2 devices and VIVE Focus Plus devices), select one of the device type options from the dropdown that appears on clicking Assign to Group.
Select the relevant group.
Click Assign.
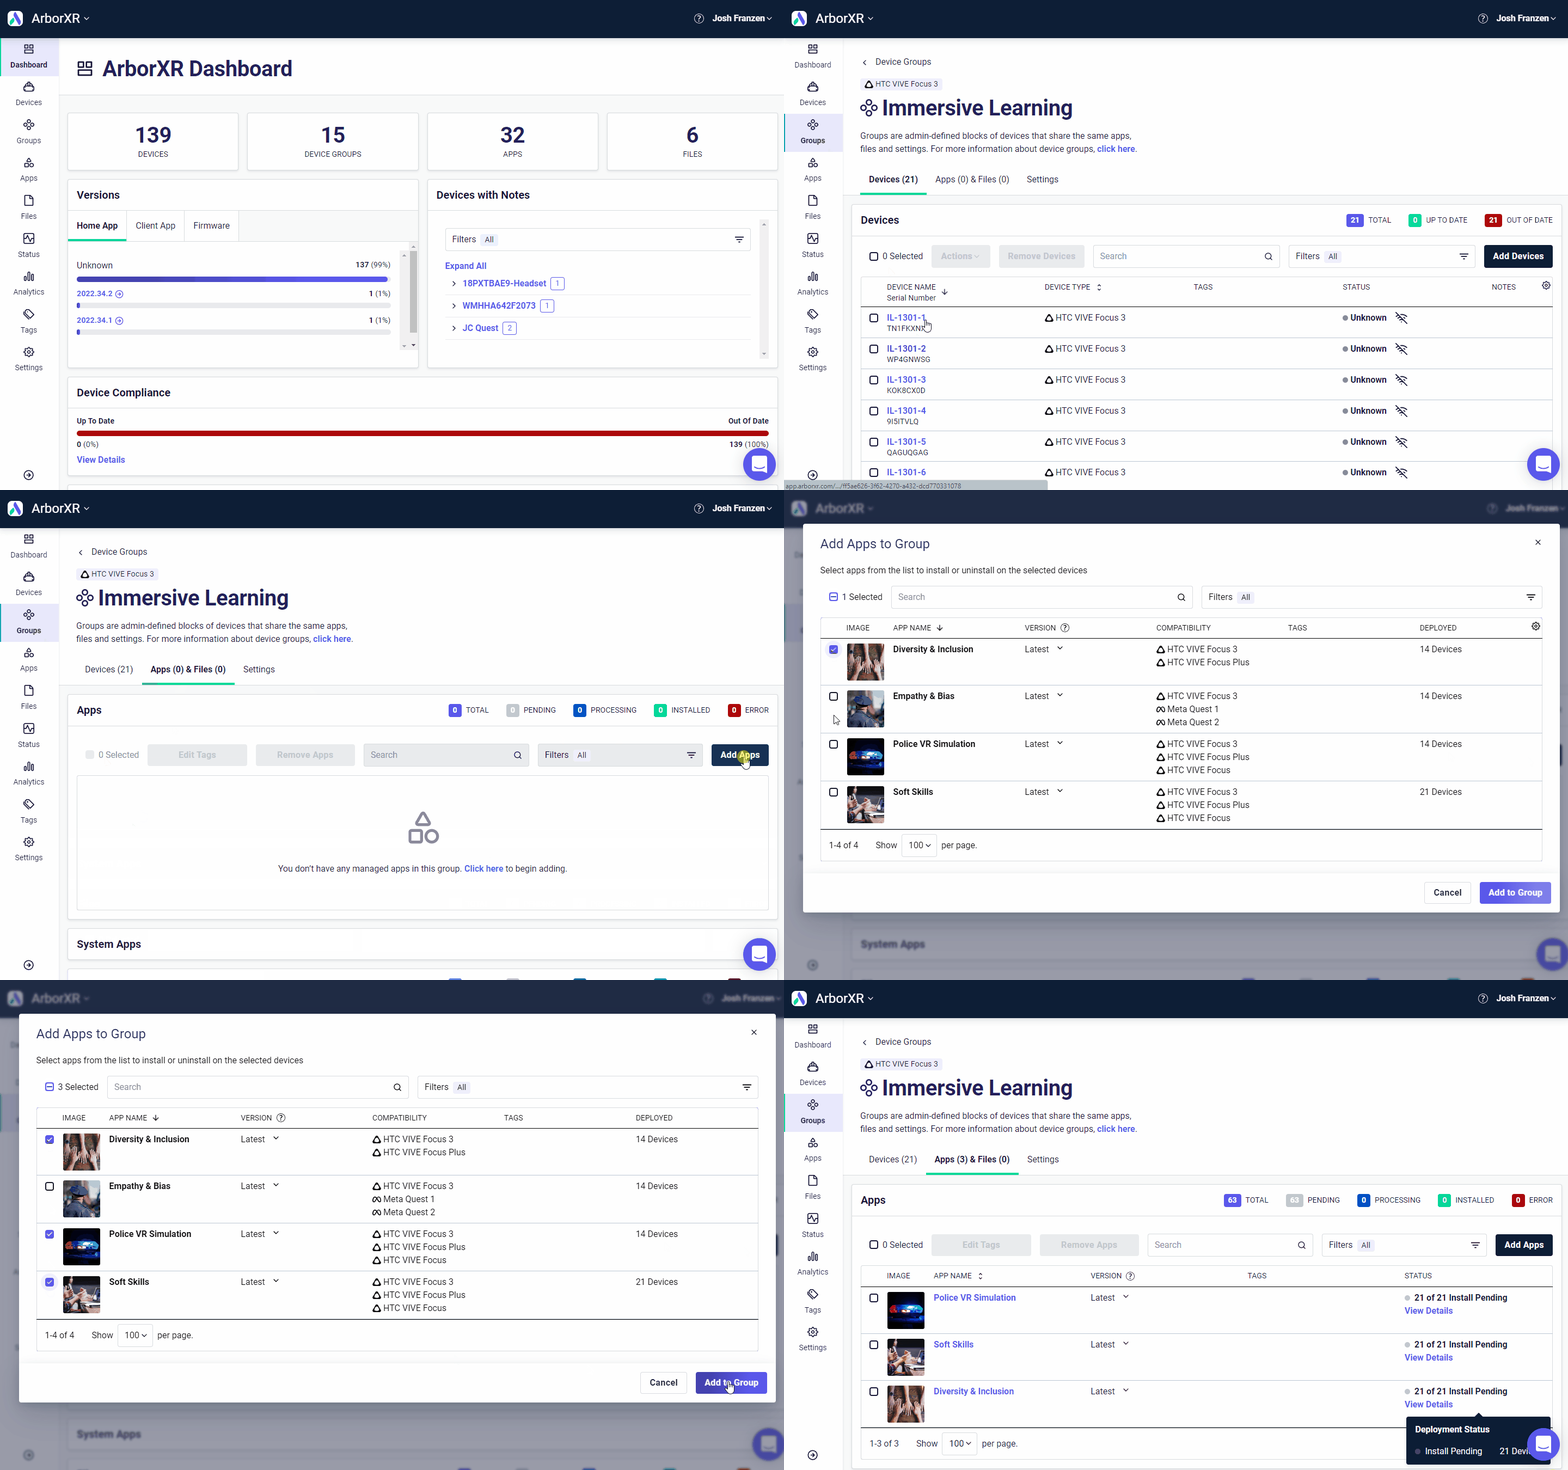
Install Apps to Devices within a Group
Option 1: Group Overview Page
Navigate to Groups in the navigation sidebar.
Navigate to the group in question.
Select the Content tab.
Click Add Apps.
Select relevant apps and specify the version of the selected apps.
Click Add to Group.
Option 2: Apps Page
Navigate to Content Library in the side navigation menu.
Select the app(s).
Click Add to Group.
If the app(s) you have selected supports multiple device types, select one of the device type options from the dropdown.
Specify the version to install to the group in the VERSION column.
Select the relevant Group(s).
Click Add.
Remove Devices from a Group
Click Groups in the navigation sidebar.
Navigate to the Group in question.
Select the device(s) in question.
Click Remove Device(s).
Click Yes, Remove.
Track the Status of App Deployments
The status of content deployments to a group of devices can be tracked in real time via the status column in the Content tab of a device group. Hover over the status column of an app or file to see the count of devices the app or file is pending to deploy to, actively installing on, or successfully installed on. Click View Details to view the deployment status for that app or file across all devices in the group.
ArborXR Home or Kiosk Mode
In some situations, it may make sense to take a device out of Kiosk mode. To do this:
Click Groups in the navigation sidebar.
Navigate to the group in question.
Select the Headset Experience tab.
Select between:
ArborXR Home: ArborXR Home is ArborXR's VR launcher that locks down the device and prevents end users from accessing the device's home environment and stock settings. The apps and settings shown in ArborXR Home can be configured to ensure end-users only have access to what they need. Likewise, the background environment (360° image) can be customized so end-users have a branded experience within VR. For more information about ArborXR Home, see the articles in the ArborXR Home.
Kiosk Mode: Kiosk mode allows only one app (the "kiosk app") to be launched upon powering on a device. This locks down the device and prevents end users from exiting the kiosk app and accessing other apps on the device. For more information about kiosk mode, see the articles in the Kiosk Mode.
Device Home Environment: This is the device's default launcher (what you normally see when putting on the headset). While in this launch method, end-users have access to all apps and settings on this device.
Click Apply Changes.
Automatic WiFi Configuration
Click Groups in the navigation sidebar.
Navigate to the group question.
Tab over to Settings.
Select WiFi from the sub navigation menu.
Click Add Configuration to open the WiFi management modal.
If you have configured WiFi network(s) previously, those will show in the Library tab where you can select one or more listed WiFi configurations then click Add.
If you do not have WiFi networks configured, or if you need to add a new one, tab over to Create New, enter your WiFi network's details, then click Add.


